In order to better test software, be it a simple API or a full UI based website, one must also learn how to build one such software. In this first post, we will explore step by step what is needed to start creating an open-source Python project based on Flask web framework, host it on Github and make the builds run on CircleCI.
For this post, the source code is on github under this hash
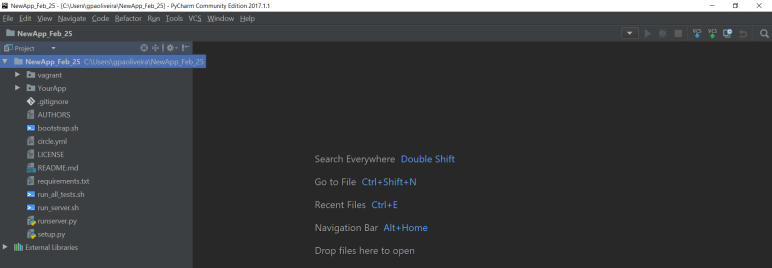
Pycharm
One can’t code without a good editor. For python, I couldn’t find anyone better than Pycharm. With an interface that has all the normal features I most use (autocompletion, renaming methods, and navigating between files with hotkeys) it also has a built-in PEP8 check on the fly.
Here’s the main screen for our project:
License, Authors and Readme files
Before delving into environment and code complexities, let’s start with License, Authors and Readme files. Although they’re easy to create and maintain, sometimes they get forgotten and there are several projects out there without them. Best of all, those tips are not python-exclusive 🙂
So, first of all, what open source license to use? This is better answered by choose a license website, that walks you through the differences between them. For myself, MIT license will do — which means, you can do whatever you want with my code, as long as you’re polite enough to say where you copied it from and not blame me when things explode. So, copy the license text from the website into your License file and you’re done.
Authors file is even easier – put your name and email so people can find you in case of questions or buy you a beer.
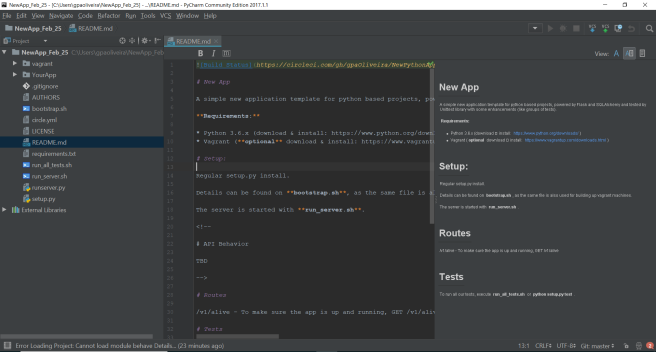
Readme file is that one who shows the face of your project for everyone. To make them fancy, write it using Markdown syntax. Pycharm has an excellent plugin to edit Markdown files and preview them on the same screen, as can be seen below:
Environment Setup
Although Python is multi-platform, some of its libraries may not be. To avoid that, it would be best to develop and run your code completely inside a Linux-based environment. For those of us who prefer to edit files on Windows, have no fear! Nowadays, editing your files on Windows but running your software on Linux is as easy as ever with a Vagrant based VM. When installing Vagrant, also install VirtualBox and OpenSSH.
Our vagrant file is inside our root folder, so the only line we need to make it possible to have synced files is:
config.vm.synced_folder "../", "/home/vagrant/"
To start the project, I simply go to the vagrant folder:
> cd YourApp/vagrant

> vagrant up && vagrant ssh
To make my life easier, I also found it interesting to group the shell installation steps into a bootstrap.sh file — both Vagrant or anyone who want to manually setup your project can use it. Mine is already ready for Python 3.6 and can be found on Github.
Finally, python packages are required to have a setup.py file that will instruct others on how to run, install and test it. Another recommendation is to use virtualenv, one we will skip due to our Vagrant-based environment. More information about python packages installation can be found here.
Our setup.py will use the License and Readme file we just created, as well as a requirements.txt file — a text file containing all the packages and versions we require. Both setup.py and requirements.txt can also be found on Github.
Finally, we have to tell CircleCI where to look for tests and what python version to use. A simple yaml file is needed. With that, you are also able to put a nice badge of the build status on your readme file 🙂
![]()
YourApp module
With the environment ready, we can start thinking on the module itself. A module in python is any folder with a __init__.py file on it, but a Flask application deserves a little more structure.
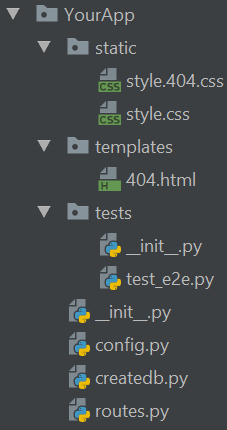
The static folder contains the CSS and JS that will be retrived on our future application. For now, empty files are thrown there.
In a similar way, templates folder holds the Jinja templates we would use. As we are just starting a REST based application, let’s just keep a 404.html there.
Tests folder is a package on itself — note the __init__.py there — and contains all the test files in the project. For now, we only have end-to-end tests, explained in the next section.
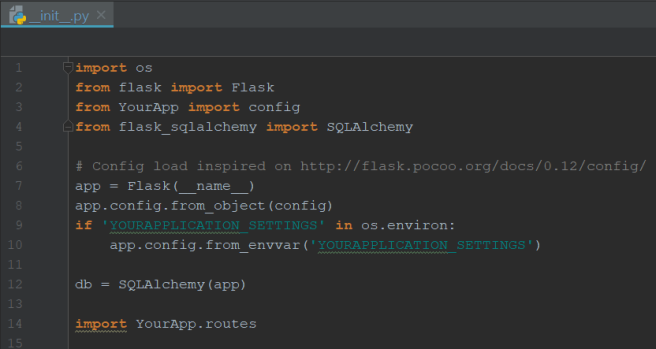
Taking inspiration from another Flask posts here and here, our __init__.py initializes the Flask app and the database, as follows:
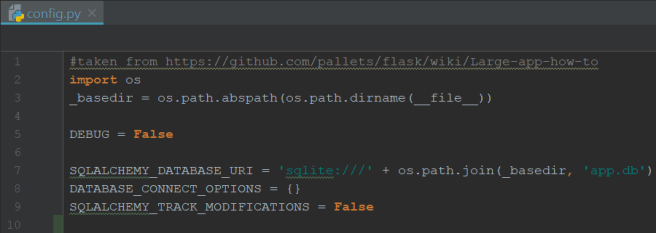
It uses the configurations defined on another file, config.py, as follows:
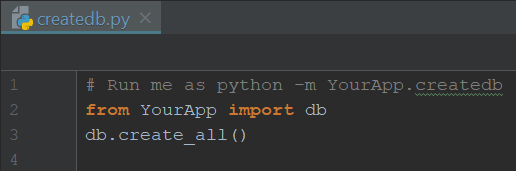
To make our life easier, wouldn’t hurt to let a createdb.py ready, as follows:
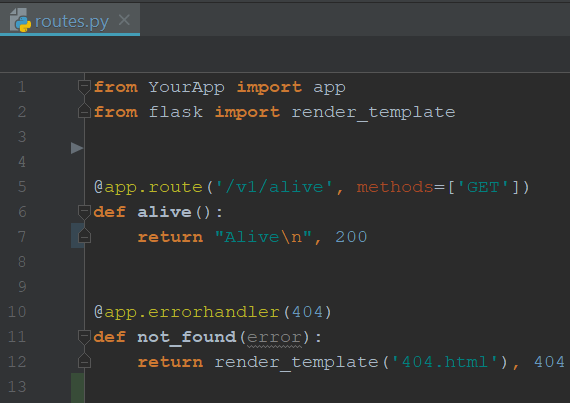
Finally, to make sure our app is up and running (and the tests are actually doing something), let’s create simple endpoints on routes.py:
Tests
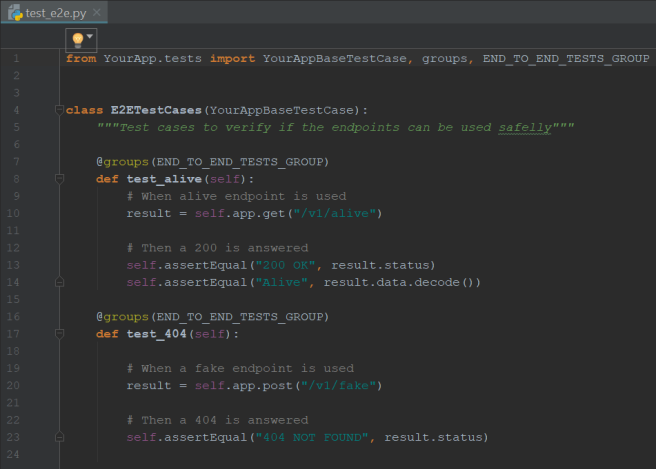
Our end-to-end tests will call our APIs directly, as a user would, and check for their responses. It will not use the code entities directly in any way — what Unit tests would do — or combine route file routines directly — what Integration tests would do.
Testing in python doesn’t require any external library – we will relly on Unittest default one here. YourAppBaseTestCase comes from unittest.TestCase and is defined on tests/__init__.py.
A nice idea taken from https://github.com/valermor/nose2-tests-recipes is the use of a groups decorator. In that way, we can combine test-class-hierarchy with any other categorization we want – such as end_to_end test cases versus unit_tests.
Finally, as a big fan of BDD practices, I find it easier to think in tests using that notation of Given/When/Then. The simple tests below help us to verify if our app is ready to go.
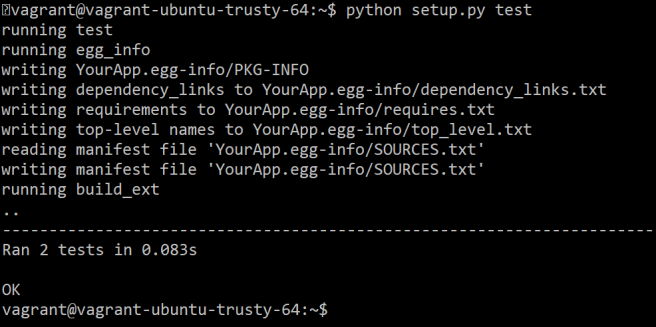
And they can be run as:
Wrapping up
With all that was set up, only one thing is missing – how to start your app! I like to keep a runserver.py file on the root folder to capture the eyes of everyone as the “main” file.
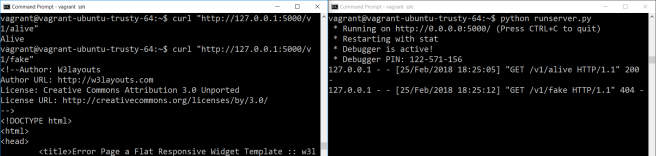
With the server up and running, we can even open another SSH session and curl-test it ourselves: